To enable Secure Boot, access the BIOS settings, locate the Secure Boot option, and enable it. Secure Boot helps protect against malware and unauthorized operating systems.
It ensures that only signed and authorized firmware and operating system loaders are executed during the boot process, providing an additional layer of security for your computer. Ensuring the security of your computer system is crucial in today’s digital age.
One way to enhance security is by enabling Secure Boot, a feature designed to prevent unauthorized software from running during the boot process. By following a few simple steps, you can activate Secure Boot and fortify your system against potential threats. This blog will guide you through the process of enabling Secure Boot and highlight its importance in safeguarding your computer from malware and unauthorized access. Let’s delve into the world of Secure Boot and learn how to bolster the security of your computing environment.
Credit: www.asus.com
Introduction To Secure Boot
To enable Secure Boot, access BIOS settings, locate the Secure Boot option, and enable it. Secure Boot enhances system security by validating firmware, drivers, and operating systems during the boot process. This feature protects against malware and unauthorized software.
Secure Boot is a security standard developed by the Unified Extensible Firmware Interface (UEFI) Forum to protect the boot process of a computer from malware attacks. It ensures that only trusted software is loaded during the boot process, preventing unauthorized access and tampering.
The Role Of Secure Boot In System Security
Secure Boot plays a critical role in ensuring the security of a computer system. It verifies the digital signature of each component of the boot process, including firmware, bootloader, and operating system kernel, before executing them. This process ensures that no malicious software can interfere with the boot process, making it impossible for attackers to gain unauthorized access to the system.
Benefits Of Using Secure Boot
The use of Secure Boot has several benefits, including:
- Protection against rootkits and other malware that can tamper with the boot process
- Prevention of unauthorized access to the system
- Enhanced system integrity and reliability
- Improved trust in the system by ensuring that only trusted software is executed
In addition to these benefits, Secure Boot is a required feature for systems that want to be certified for use with Windows 8 and later versions. This certification ensures that the system meets the security and reliability standards set by Microsoft. In conclusion, Secure Boot is an essential security feature that helps protect the boot process of a computer from malware attacks.
By verifying the digital signature of each component of the boot process, Secure Boot ensures that only trusted software is executed, preventing unauthorized access and tampering. The benefits of using Secure Boot include protection against rootkits and other malware, enhanced system integrity and reliability, and improved trust in the system.
Prerequisites For Enabling Secure Boot
How to Enable Secure Boot? Before you can enable Secure Boot on your system, there are several prerequisites that need to be addressed. These prerequisites include checking system compatibility and updating the BIOS/UEFI firmware.
Checking System Compatibility
First, ensure that your system supports Secure Boot. You can check this by accessing the BIOS/UEFI settings. Look for an option related to Secure Boot under the security or boot tabs.
Updating Bios/uefi Firmware
It’s essential to have the latest BIOS/UEFI firmware installed before enabling Secure Boot. Check the manufacturer’s website for the latest firmware updates for your specific system model. Download and install the updates following the provided instructions to ensure compatibility with Secure Boot.
Back Up Your Data
Don’t risk losing important files. Back up your data regularly to ensure protection.
Importance Of Data Backup
Data loss can happen unexpectedly. Backup is your safety net.
Methods For Secure Data Backup
- External hard drives
- Cloud storage services
- Network-attached storage
:max_bytes(150000):strip_icc()/disablesecureboot02-c88e3bc90b4d466e9dd986b35da01a04.jpg)
Credit: www.lifewire.com
Entering The Bios/uefi Settings
To enable Secure Boot, access the BIOS/UEFI settings on your device. Follow the steps to navigate to the Secure Boot option and enable it for enhanced system security. Safeguard your device against unauthorized software and boot processes with this important configuration.
Entering the BIOS/UEFI settings is a crucial step in enabling Secure Boot on your computer. This process allows you to access the necessary configuration options to enable this security feature. To get started, you will need to restart your computer and enter the BIOS/UEFI setup utility. Here’s how to do it:
Restarting Your Computer To Access Bios/uefi
To begin, save any open files and click on the “Start” menu. Select the “Restart” option from the dropdown menu. Alternatively, you can press and hold the power button until your computer shuts down, and then press it again to turn it back on. Make sure to perform a full restart, as a simple reboot may not give you access to the BIOS/UEFI settings.
Navigating Bios/uefi Setup Utility
Once your computer restarts, it will display a screen with the manufacturer’s logo. At this point, you need to press a specific key to enter the BIOS/UEFI setup utility. The key may vary depending on your computer manufacturer, but commonly used keys include F2, F10, Del, or Esc. Refer to your computer’s documentation or the manufacturer’s website to determine the correct key. When you press the designated key, you will be taken to the BIOS/UEFI setup utility.
This interface allows you to configure various settings related to your computer’s hardware and security features. You can navigate through the different menus and options using the arrow keys on your keyboard. It is important to ensure that you follow the manufacturer’s instructions and guidelines while making changes in the BIOS/UEFI setup utility. Look for the “Security” or “Boot” section, where you will find the option to enable Secure Boot. Once you locate it, use the arrow keys to select the option and press Enter to enable it.
Remember to save your changes before exiting the BIOS/UEFI setup utility. Look for the “Save and Exit” or similar option, and confirm your selection. Your computer will then restart, and Secure Boot will be enabled, adding an extra layer of security to your system. Enabling Secure Boot through the BIOS/UEFI settings helps protect your computer from unauthorized software and ensures that only trusted operating systems are loaded during the boot process. Take the time to navigate through the BIOS/UEFI setup utility and enable this valuable security feature for enhanced peace of mind.
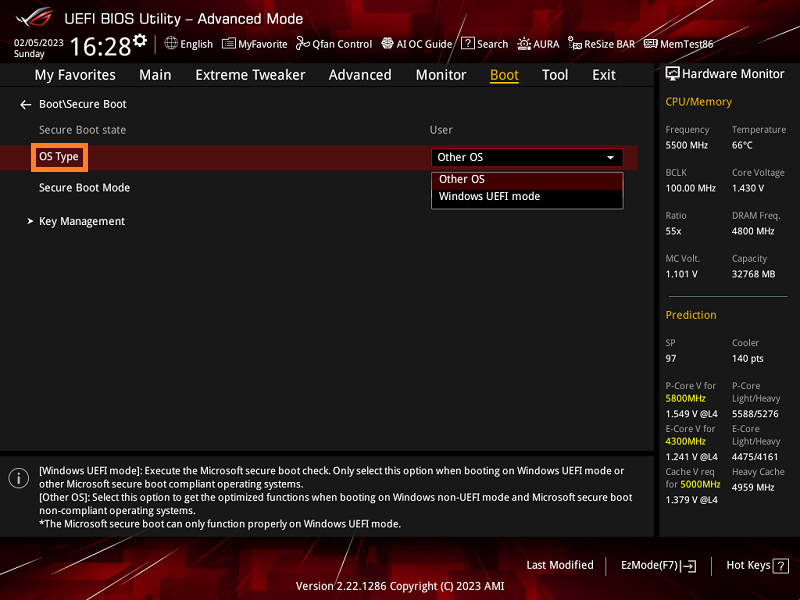
Locating The Secure Boot Option
When it comes to securing your computer system, enabling Secure Boot is an essential step. This feature helps prevent the loading of unauthorized operating systems and ensures that only trusted software is executed during the boot process. In this guide, we will focus on locating the Secure Boot option within the BIOS or UEFI interface.
Identifying The Secure Boot Setting
To enable Secure Boot, you first need to locate the setting within your system’s BIOS or UEFI. The exact location of this option can vary depending on the manufacturer and model of your motherboard. In most cases, you can find it within the security or boot sections of the BIOS/UEFI interface.
Understanding Different Bios/uefi Interfaces
Different manufacturers may have varying interfaces for their BIOS/UEFI settings. Some common interfaces include American Megatrends (AMI), Phoenix-Award, and InsydeH2O. Understanding the specific interface of your system can help in efficiently navigating to the Secure Boot setting.
Configuring Secure Boot Settings
Configuring Secure Boot settings is an essential step in ensuring the security of your system. By enabling Secure Boot and setting up key management, you can protect your computer from unauthorized access and malicious software. In this section, we will guide you through the process of enabling Secure Boot and setting up key management for enhanced security.
Enabling Secure Boot
To enable Secure Boot on your system, follow these simple steps:
- Access the BIOS settings by restarting your computer and pressing the designated key (such as F2 or Del) during startup.
- Navigate to the “Secure Boot” or “Security” section in the BIOS menu.
- Enable Secure Boot by selecting the option and setting it to “Enabled”.
- Save the changes and exit the BIOS settings.
Setting Up Key Management For Secure Boot
Once Secure Boot is enabled, it is crucial to set up key management to ensure the authenticity of the operating system and boot components. Follow these steps:
- Obtain the necessary digital certificates from trusted sources, such as the operating system provider or hardware manufacturer.
- Access the BIOS settings and navigate to the “Key Management” or “Secure Boot Keys” section.
- Import the digital certificates into the BIOS by following the provided instructions.
- Verify and enable the imported certificates to establish trust for the operating system and boot components.
By configuring Secure Boot settings and setting up key management, you can enhance the security of your system and protect it from unauthorized access and malware attacks. It is important to regularly update the digital certificates and keep your system’s firmware up to date for optimal security.
Finalizing And Testing Secure Boot Activation
After configuring Secure Boot settings in BIOS/UEFI, it’s crucial to finalize and test the activation to ensure the system’s security. Follow the steps below to complete the process successfully.
Saving Changes And Exiting Bios/uefi
- Access the BIOS/UEFI setup by restarting your computer and pressing the designated key.
- Navigate to the “Save & Exit” or similar tab using the arrow keys.
- Choose “Save Changes and Reset” to apply the Secure Boot configuration.
- Exit the BIOS/UEFI interface to restart the system.
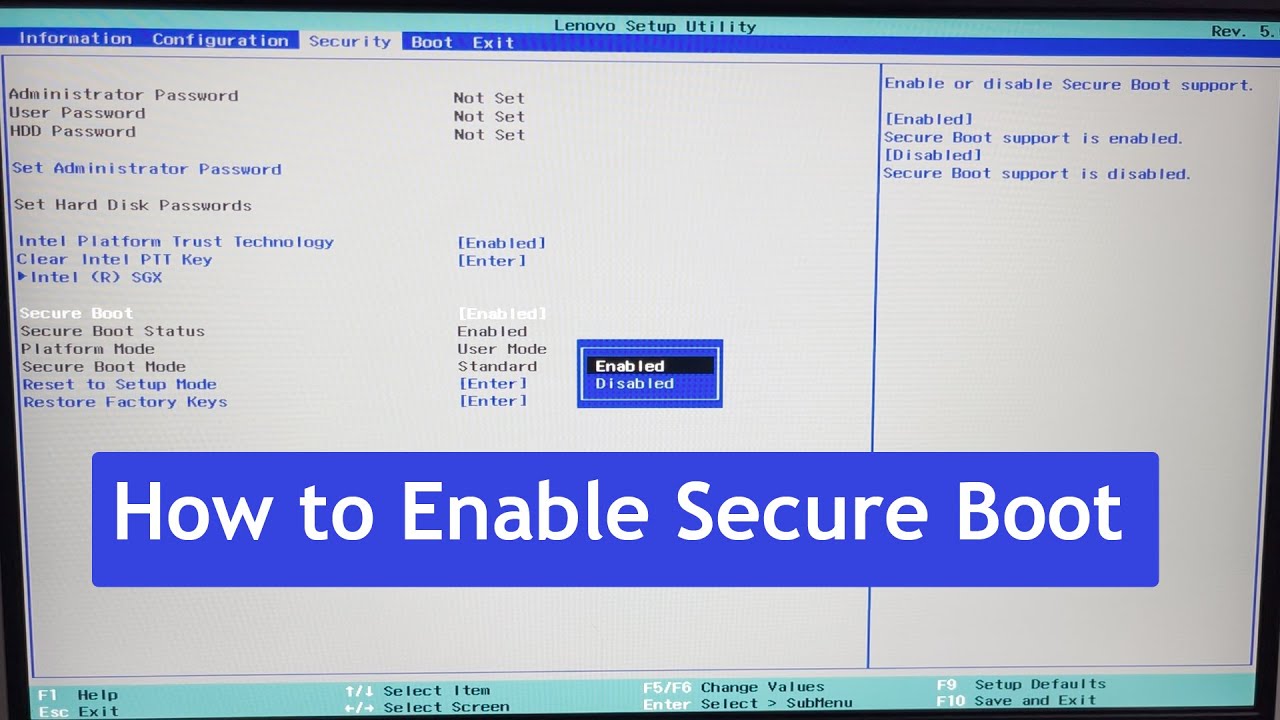
Verifying Secure Boot Is Enabled
- Restart the computer and access BIOS/UEFI setup again.
- Locate the Secure Boot option under the “Security” or “Boot” tab.
- Ensure that Secure Boot is set to Enabled.
- Save changes and exit BIOS/UEFI to complete the process.
Troubleshooting Common Secure Boot Issues
To enable Secure Boot, troubleshoot common issues by verifying the firmware settings and updating the system BIOS. Ensure that the necessary keys are properly installed to prevent boot errors and maintain system security.
Handling Boot Errors After Enabling Secure Boot
If you encounter boot errors, restart the system and access BIOS. Ensure Secure Boot is enabled and that the boot order is correct. Check for any recent hardware changes and ensure they are compatible with Secure Boot. Update the system firmware to the latest version.
Managing Compatibility Problems With Hardware And Software
Verify that all hardware components are Secure Boot compatible. Check for driver updates and install any available updates. For software compatibility, ensure that all applications are securely signed. Contact the software vendor for any Secure Boot-related issues. Disable Secure Boot temporarily to troubleshoot compatibility problems. Re-enable it after resolving the issues. Consult the system manufacturer for any specific Secure Boot compatibility guidelines.
Maintaining System Security Post-activation
Secure Boot is an essential feature for maintaining system security post-activation. By enabling Secure Boot, users can ensure that only trusted software is loaded during the boot process, protecting against unauthorized access and malware threats. This simple step adds an extra layer of protection to safeguard your system and data.
Regularly Updating Your System
Regular updates bolster system security by patching vulnerabilities quickly. Enable automatic updates to ensure timely protection. Regularly check for updates manually if necessary.
Best Practices For Ongoing Protection
Use reputable security software to enhance protection. Employ strong, unique passwords for all accounts. Educate yourself on latest security threats and prevention techniques.
Credit: softkeys.uk
Frequently Asked Questions
How Does Secure Boot Work?
Secure Boot is a feature that ensures only trusted software is loaded during the system startup process. It verifies the digital signatures of firmware, bootloaders, and operating system kernels, providing protection against malware and unauthorized software modifications.
Why Is Secure Boot Important For System Security?
Secure Boot helps protect your system against malicious software that may attempt to tamper with the boot process. By verifying the integrity of each component loaded during startup, it ensures that only trusted software is executed, reducing the risk of unauthorized access and system compromise.
How Can I Enable Secure Boot On My Device?
To enable Secure Boot, access your system’s BIOS or UEFI settings during startup. Look for the Secure Boot option and enable it. Keep in mind that some older devices may not support Secure Boot, so it’s important to check your system’s documentation or contact the manufacturer for specific instructions.
What If My Device Doesn’t Support Secure Boot?
If your device doesn’t support Secure Boot, it’s recommended to update your system’s firmware or consider upgrading to a newer device that offers this feature. While Secure Boot enhances system security, it’s important to ensure that your device meets the necessary requirements for enabling this functionality.
Conclusion
Enabling secure boot is a crucial step in ensuring the security of your system. With the steps outlined in this post, you can enable secure boot on your device and protect it from potential threats. Remember to keep your firmware up to date and to only install trusted operating systems and drivers.
By implementing these measures, you can enjoy a more secure computing experience and avoid falling victim to cyber attacks.