To sew, you need a sewing machine and basic sewing skills. Sewing involves stitching fabrics together using a needle and thread.
It is a practical and creative skill that allows you to create and mend clothing, home decor, and accessories. With the right tools and techniques, you can easily learn how to sew and enjoy the satisfaction of making your own unique items.
Whether you are a beginner or an experienced sewer, this guide will provide you with the necessary steps and tips to get started on your sewing journey. So, let’s dive in and discover the wonderful world of sewing!
Getting Started With Sewing
Embark on your sewing journey with confidence by mastering basic stitches and learning to operate a sewing machine. Start by selecting easy projects like pillow covers or tote bags to practice your skills. Experiment with different fabrics and patterns to unleash your creativity and hone your sewing abilities.
Choosing Your Tools
Start by selecting a sewing machine that suits your needs.
Get essential tools like scissors, pins, and measuring tape.
Invest in quality thread, needles, and a seam ripper for repairs.
Selecting Fabrics
Choose fabrics based on your project requirements.
Consider factors like fabric weight, stretch, and texture.
Experiment with different fabrics to learn their properties.
Getting Started with Sewing:
Sewing is a rewarding and creative skill to learn. Whether you’re a beginner or looking to enhance your skills, understanding the basics is crucial.
Credit: www.artofmanliness.com
Basic Sewing Techniques
Basic sewing techniques are essential for anyone who wants to start sewing, whether by hand or machine. In this post, we’ll focus on the hand-stitching essentials and machine sewing basics. By mastering these fundamental skills, you’ll be able to tackle a wide variety of sewing projects with confidence.
Hand-stitching Essentials
Hand-stitching is a useful skill to have, especially when it comes to small repairs and finishing details. Here are some hand-stitching essentials you should know:
- Threading a needle: To thread a needle, cut a length of thread and insert one end through the eye of the needle. Pull the thread through until you have an equal length on both sides.
- Knotting the thread: To knot the thread, tie a small knot at one end of the thread. This will prevent the thread from pulling through the fabric.
- Running stitch: The running stitch is the most basic hand-stitch. To do a running stitch, insert the needle through the fabric and pull the thread through. Continue stitching in a straight line, keeping the stitches even.
- Backstitch: The backstitch is stronger than the running stitch and is often used for seams. To do a backstitch, start with a small stitch. Then, insert the needle back through the fabric a short distance behind the first stitch and bring it up through the fabric a short distance ahead of the first stitch. Repeat this process to create a strong seam.
Machine Sewing Basics
Machine sewing is faster than hand-sewing and allows you to tackle larger and more complex projects. Here are some machine sewing basics you should know:
- Threading the machine: To thread a sewing machine, follow the instructions in your machine’s manual. Make sure the thread is properly threaded through the machine and the needle.
- Adjusting the tension: The tension controls how tightly the thread is pulled through the fabric. Adjust the tension based on the type of fabric you’re using and the stitch you’re sewing.
- Straight stitch: The straight stitch is the most basic machine stitch. To do a straight stitch, set your machine to the straight stitch setting and sew in a straight line.
- Zigzag stitch: The zigzag stitch is useful for finishing edges and sewing stretchy fabrics. To do a zigzag stitch, set your machine to the zigzag stitch setting and adjust the width and length as needed.
Reading And Using Patterns
When it comes to sewing, reading and using patterns is an essential skill. Patterns are like roadmaps that guide you through the sewing process, ensuring that your project turns out just the way you want it to. In this section, we will explore how to interpret pattern symbols and adjust patterns to fit your measurements.
Interpreting Pattern Symbols
Pattern symbols may seem like a foreign language at first, but once you understand their meaning, they become invaluable tools in your sewing journey. These symbols provide instructions on how to cut the fabric, stitch the seams, and add any necessary embellishments. Here are a few common pattern symbols you should familiarize yourself with:
| Symbol | Meaning |
|---|---|
| + | Add |
| – | Subtract |
| ↔ | Match two pieces together |
| ○ | Mark a point |
By understanding these symbols, you can follow the pattern instructions with ease and create a garment that fits you perfectly.
Adjusting Patterns To Fit
One of the challenges of using patterns is that they are often designed with standard sizes in mind. However, everyone’s body is unique, and it is essential to adjust the patterns to fit your measurements accurately. Here are a few tips for adjusting patterns:
- Measure yourself accurately: Take precise measurements of your bust, waist, hips, and other relevant areas to determine the size adjustments needed.
- Compare your measurements to the pattern: Check the pattern’s size chart and select the size that corresponds closest to your measurements.
- Make a muslin test garment: Use inexpensive fabric to sew a mock-up of the pattern and try it on. This step allows you to make any necessary adjustments before cutting into your desired fabric.
- Alter the pattern: Once you identify areas that require modification, such as adding or subtracting inches, make adjustments directly on the pattern pieces.
- Test and refine: After making alterations, sew another test garment to ensure the fit is accurate. Make further adjustments if needed.
By adjusting patterns to fit your unique measurements, you can create garments that flatter your body shape and make you feel confident.

Credit: www.youtube.com
Creating Your First Project
If you’re new to sewing, it’s important to start with a beginner-friendly project to build your skills. One easy and practical project to start with is a simple tote bag. In this tutorial, you’ll learn how to create your first tote bag and customize it to your liking.
Simple Tote Bag Tutorial
To create your tote bag, you’ll need:
- Fabric (1 yard for the exterior and 1 yard for the lining)
- Cutting mat
- Ruler
- Fabric scissors
- Sewing machine
- Thread
Follow these steps to make your tote bag:
- Cut two pieces of fabric (one for the exterior and one for the lining) to 15×16 inches.
- Place the two pieces of fabric right sides together and sew around the sides and bottom, leaving the top open.
- Box the corners by flattening the bottom seam and sewing a straight line across each corner, about 2 inches from the point.
- Turn the bag right side out and press it flat.
- Cut two straps from the fabric, each measuring 22×4 inches.
- Fold each strap in half lengthwise and press it flat. Then, fold the edges in towards the center and press again.
- Sew a straight line down each side of the strap.
- Attach the straps to the bag by sewing them onto the exterior of the bag, about 2 inches from the sides and 3 inches from the top.
Customizing Your Tote Design
Once you’ve created your basic tote bag, you can customize it to your liking. Here are some ideas:
- Use different fabrics for the exterior and lining
- Add pockets to the interior or exterior of the bag
- Decorate the bag with embroidery or appliqué
- Add a closure, such as a zipper or button
- Make the straps longer or shorter for a different look
With a little creativity, you can create a tote bag that’s both functional and stylish. Happy sewing!
Sewing Tips For Beginners
Sewing is a wonderful and practical skill to learn, and it’s never too late to start. If you’re new to sewing, here are some valuable sewing tips for beginners to help you get started on the right foot.
Seam Allowances And Edges
Understanding seam allowances is crucial for successful sewing projects. Most patterns will indicate the seam allowance required, typically ⅝ of an inch. It’s essential to measure and mark the allowance accurately to ensure precise seams.
When it comes to finishing edges, there are various methods to prevent fraying and create a professional-looking finish. Options include using pinking shears, serging, or zigzag stitching.
Troubleshooting Common Issues
Learn how to sew, as a beginner, you may encounter common sewing issues such as thread tension problems or seam puckering. To troubleshoot these problems, always start by rethreading the machine and adjusting the tension. Ensure the machine is properly threaded and that the needle is suitable for the fabric being used.
- Ensure that the bobbin is inserted correctly and that the thread is properly wound.
- Check the needle for any signs of damage or wear and replace if necessary.
- Use the appropriate needle and thread for the fabric you are working with.
- Practice on scrap fabric to test the tension and stitch quality before starting on your actual project.

Credit: www.pinterest.com
Advanced Sewing Projects
Once you have mastered the basics of sewing, it’s time to take your skills to the next level with advanced sewing projects. These projects will challenge your creativity and allow you to create unique and personalized items. In this article, we will explore two exciting advanced sewing projects: crafting a quilt and designing your own clothes.
Crafting A Quilt
Quilting is a beloved sewing technique that involves stitching together multiple layers of fabric to create a warm and cozy blanket. If you’re ready to tackle this advanced project, here’s a step-by-step guide to get you started:
- Choose your quilt pattern and gather the necessary materials, including fabric, batting, and thread.
- Measure and cut the fabric into the desired quilt blocks or shapes.
- Arrange the fabric pieces in your desired pattern, ensuring they are aligned correctly.
- Pin the fabric pieces together to secure them in place.
- Using a sewing machine or hand stitching, sew along the edges of the fabric pieces to join them together.
- Continue sewing until all the fabric pieces are connected, creating the quilt top.
- Layer the quilt top with batting and backing fabric.
- Secure the layers together by quilting or tying the layers at regular intervals.
- Finish off your quilt by adding a binding around the edges.
With patience and practice, you’ll have a beautiful quilt that showcases your sewing skills and creativity.
Designing Your Own Clothes
If you’re looking to take your sewing skills to the runway, designing your own clothes is the ultimate challenge. Here’s how you can bring your fashion vision to life:
- Start by sketching your design ideas on paper to visualize your garment.
- Take accurate body measurements to ensure a perfect fit.
- Select the appropriate fabric for your design and gather the necessary materials, such as zippers, buttons, and thread.
- Create a pattern for your garment using pattern-making techniques or by modifying an existing pattern.
- Cut the fabric according to your pattern, making sure to follow the grainline and mark any notches or darts.
- Pin the fabric pieces together, then sew them using the appropriate stitches and techniques.
- Try on the garment as you progress to make any necessary adjustments for fit and style.
- Finish your garment by hemming, adding closures, and any additional embellishments.
Designing your own clothes allows you to express your personal style and create one-of-a-kind pieces that fit perfectly. Embrace your creativity and experiment with different fabrics, patterns, and techniques to bring your fashion dreams to life.
Finishing Touches
When it comes to sewing, the Finishing Touches are what truly elevate your project to a professional level.
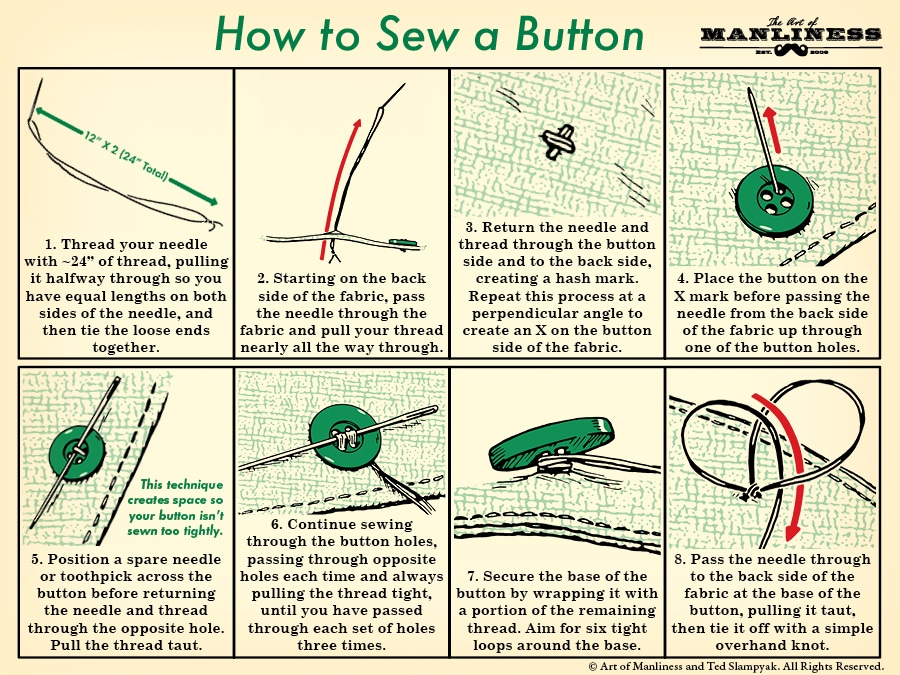
Adding Zippers And Buttons
For adding zippers, ensure to align the zipper tape correctly and secure it with pins before stitching.
Button sewing is easier with a shank for thickness. Attach buttons securely using a strong thread.
Hemming Techniques
Hemming pants? Try blind stitching for an invisible finish. Fold fabric under twice to secure the hem.
For a clean look on skirts, use a topstitch or hand-sew a rolled hem. Press the hem for a crisp finish.
Maintaining Your Sewing Equipment
Proper maintenance of your sewing equipment is essential for successful sewing. Regularly clean and oil your machine, replace worn-out parts, and store it in a dust-free environment. Following these steps will ensure your sewing machine remains in optimal condition, allowing you to enjoy seamless sewing experiences.
Maintaining Your Sewing Equipment is crucial for optimal performance. Proper care ensures longevity and quality of your tools.
Cleaning Your Sewing Machine
Regularly clean your sewing machine to prevent build-up. Use a soft brush and
to remove dust and lint.
Sharpening Scissors
are essential for precise cuts. Use a sharpening stone or professional service. Remember, a well-maintained sewing equipment leads to better results!
Finding Inspiration For Future Projects
Sewing enthusiasts are always on the lookout for new ideas and inspiration for their next creative endeavor. Whether you are a seasoned sewer or just starting out, exploring various sources can ignite your creativity and drive your passion for sewing.
Exploring Online Communities
Online sewing communities are treasure troves of ideas and inspiration. Joining forums, Facebook groups, or following sewing influencers on Instagram can expose you to a plethora of projects, techniques, and trends.
Attending Sewing Workshops
Participating in sewing workshops not only enhances your skills but also opens doors to new project ideas. Interacting with fellow sewers and learning from experienced instructors can spark your imagination and motivate you to try new techniques.
Frequently Asked Questions
How To Choose The Right Fabric For Sewing?
Select a fabric that suits your sewing project. Consider weight, stretch, and texture to ensure the best outcome.
What Are The Essential Tools For Sewing?
Basic sewing tools include a sewing machine, needles, threads, scissors, pins, and a measuring tape. These tools are essential for any sewing project.
How Do I Take Accurate Body Measurements For Sewing?
Use a flexible tape measure to take body measurements. Measure the bust, waist, hips, and inseam to ensure a well-fitted garment.
What Are The Common Sewing Mistakes To Avoid?
Common sewing mistakes include using the wrong needle, not securing stitches, and neglecting to press seams. Attention to detail can prevent these errors.
Conclusion
Sewing is a valuable skill that offers creativity and practicality. Whether you’re a beginner or experienced, the satisfaction of creating something with your own hands is unparalleled. With the right tools and techniques, anyone can enjoy the art of sewing and unleash their inner designer.
Start sewing today!