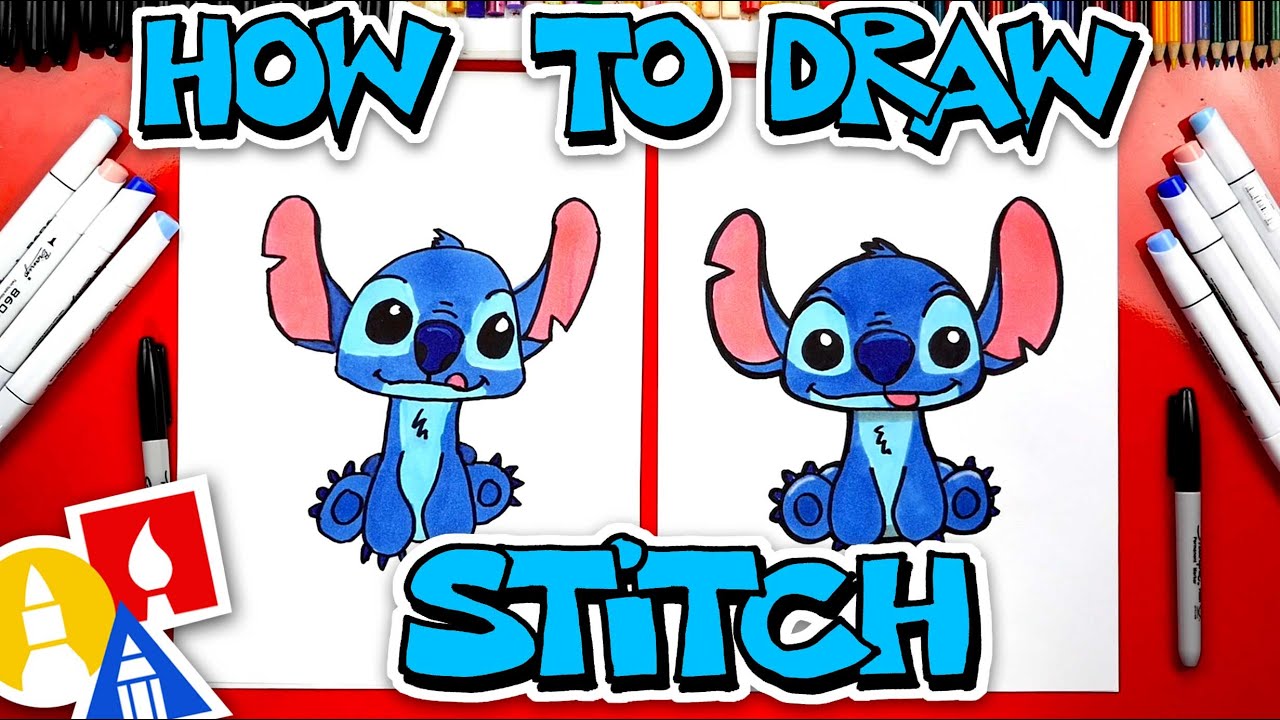
To draw Stitch, start by sketching a large oval for the head. Add two small circles for the eyes and a smaller oval beneath them for the nose.
Draw two curved lines for the mouth and add details like teeth and a tongue. Next, create Stitch’s ears by drawing two pointy shapes on either side of the head. Connect the head to the body by drawing a curved line and add arms and legs using simple curved lines.
Finally, complete Stitch’s look by adding details like fur, spots, and claws.

Credit: www.pinterest.com
Introduction To Drawing Stitch
The Popularity Of Stitch
Stitch, also known as Experiment 626, has gained immense popularity as a beloved character from the Disney movie “Lilo & Stitch.” With his endearing personality and unique appearance, he has captured the hearts of fans worldwide.
Materials Needed
Before you start drawing Stitch, gather the following materials:
- Pencil
- Eraser
- Drawing paper
- Colored pencils or markers (optional)

Credit: www.youtube.com
Preparing Your Workspace
Learn how to draw Stitch by preparing your workspace for a smooth and enjoyable drawing experience. With these simple tips, you can create a comfortable and organized environment that allows you to focus on bringing this beloved character to life on paper.
Choosing The Right Environment
Before starting to draw Stitch, it is important to choose the right environment for your workspace. Choose a quiet, well-lit area where you can concentrate without any distractions. Make sure the temperature is comfortable and there is enough space for your art supplies.
Organizing Art Supplies
Organizing your art supplies is an essential part of preparing your workspace. Ensure that you have all the necessary art supplies, including pencils, erasers, paper, and any other materials you may need. Keep your art supplies organized and easily accessible, so that you can work efficiently.
Tips for Organizing Art Supplies:
- Use a pencil case or container to keep your pencils and erasers together.
- Keep your paper neatly stacked and within reach.
- Label your art supplies to make it easier to find what you need.
- Have a separate container for your coloring materials, such as markers or colored pencils.
Recommended Art Supplies:
| Art Supplies | Recommended Brands |
|---|---|
| Pencils | Derwent, Faber-Castell, Staedtler |
| Erasers | Pentel, Tombow, Faber-Castell |
| Paper | Strathmore, Canson, Fabriano |
| Coloring Materials | Prismacolor, Copic, Faber-Castell |
By following these tips for preparing your workspace, you will be able to draw Stitch with ease and create a beautiful piece of art. Remember to keep your workspace clean and organized, and to take breaks when necessary to avoid fatigue. Happy drawing!
Basic Shapes And Proportions
Learn to draw Stitch by mastering basic shapes and proportions. Start with simple circles and ovals to create his head and body, then add details to bring him to life. Understanding these fundamental elements will help you capture Stitch’s unique charm in your artwork.
Starting With Circles And Ovals
To draw Stitch, begin with circles and ovals. Create head using a large circle. Add body using an oval shape.
Establishing Stitch’s Body Proportions
Ensure head is smaller than body. Limbs are thin and long. Eyes are big and expressive. Use circles and ovals to draw Stitch. Pay attention to body proportions.
Sketching Stitch’s Head
Learn how to draw Stitch by sketching his head with these easy steps. Start with a basic circle, add his signature ears, and then outline his face and features. With a little practice, you’ll be able to capture Stitch’s adorable expression in no time!
Outlining The Face
When sketching Stitch’s head, start by outlining the basic shape of his face. Begin with a rough circle to represent the overall shape. Then, draw two curved lines extending from the bottom of the circle to create Stitch’s lower jaw. Remember to keep your lines light and loose for easy adjustments.
Adding The Eyes And Nose
Next, focus on adding Stitch’s distinctive eyes and nose. For the eyes, draw two large oval shapes within the upper part of the circle. Make sure to leave some space in between them. To give Stitch his mischievous look, add a small curve at the top of each eye to represent his raised eyebrows.
Now, it’s time to draw Stitch’s nose. Place a small, triangular shape just below the center of the eyes. This will be the base of his nose. From there, draw two curved lines extending downward to form the sides of his nose. Connect these lines at the bottom to create the tip of his nose.
Remember to keep your lines light and adjustable as you go. You can always refine and add details later. Don’t worry about perfection at this stage; the goal is to capture the basic features of Stitch’s head.
Drawing Stitch’s Body
When it comes to drawing Stitch, capturing his unique body shape and features is crucial. Let’s dive into the process of Drawing Stitch’s Body. From his distinctive torso to his arms and legs, we’ll explore the steps to bring this beloved character to life on paper.
Creating The Torso
To begin, sketch a circular shape for Stitch’s torso. Use a reference image to ensure the proportions are accurate. Then, add a smaller oval shape below the torso to represent his lower body. Pay attention to the placement of these shapes to capture Stitch’s adorable physique.
Drawing Arms And Legs
Start by adding short, stubby arms on either side of the torso. Stitch’s arms are distinctive for their small, round shape. Next, draw his legs, which are thicker at the top and taper down to narrower feet. Ensure that his legs are slightly bent to convey a playful stance.
Detailing Facial Features
When it comes to drawing Stitch, one of the most important aspects is capturing his unique facial features. By paying attention to the details of his eyes, mouth, and ears, you can bring this lovable character to life on paper. In this guide, we will break down the process of perfecting these features step by step.
Perfecting The Eyes
Stitch’s eyes are a key characteristic that defines his mischievous and adorable personality. To draw his eyes, follow these simple steps:
- Start by drawing two oval shapes for the eyes, slightly tilted towards each other.
- Add small ovals within each eye to represent the pupils.
- Draw a curved line above each eye to create the eyelids.
- Complete the eyes by adding eyelashes at the outer corners, using short curved lines.
Remember to leave a small amount of white space in the eyes to give them a lively sparkle. Once you have mastered the basic eye shape, feel free to experiment with different expressions to capture Stitch’s playful nature.
Mouth And Ears Details
Stitch’s mouth and ears are another crucial aspect of his unique appearance. Here’s how you can add the finishing touches:
- For the mouth, draw a small curved line below the eyes, slightly angled upwards. Add a tiny triangular shape at the end of the line to represent his nose.
- To create Stitch’s wide smile, draw a curved line below the nose, extending towards the sides of his face.
- For the ears, draw two large curved triangles on either side of Stitch’s head, starting from the top and tapering towards the bottom.
- Add smaller curved lines within the ears to represent the inner details.
Pay attention to the placement and size of the mouth and ears to ensure they complement the overall proportions of Stitch’s face.
By focusing on these specific facial features and following these step-by-step instructions, you’ll be able to draw Stitch with accuracy and capture his playful charm. Don’t be afraid to add your own personal touches and experiment with different expressions to make your drawing truly unique!
Adding Texture And Patterns
To draw Stitch, enhance your artwork with intricate textures and patterns to capture his unique appearance. Experiment with cross-hatching and details to bring out his fluffy fur and playful personality on paper. Incorporating these elements will add depth and realism to your drawing.
Fur Texturing Techniques
Adding texture to Stitch’s fur can be achieved by using short, quick strokes.
Marking The Alien Patterns
Create Stitch’s unique alien patterns with a fine-tipped pen or marker. Begin by adding texture to Stitch’s fur using short strokes. Use a fine-tipped pen to mark the alien patterns.
Final Touches
Final touches are crucial to bring your drawing of Stitch to life. In this stage, you will focus on adding details that will enhance the overall appearance of your artwork.
Erasing Guide Lines
Remove any remaining sketch lines to make your drawing cleaner and more polished.
Shading And Highlights
Add depth by shading darker areas and incorporating highlights to create a more realistic look.
Coloring Your Drawing
When coloring Stitch, choose bright and vibrant colors.
To add depth, apply lighter and darker shades strategically.

Credit: www.pinterest.com
Showcasing Your Artwork
Once you’ve completed your Stitch drawing, it’s time to showcase your masterpiece to the world. Here are some tips on how to frame, display, and share your artwork effectively.
Framing And Display
Consider framing your Stitch drawing to protect it and enhance its visual appeal. Choose a frame that complements your artwork and find a suitable location to display it prominently in your home or workspace.
Sharing Online
Share your Stitch drawing with a wider audience by posting it on social media platforms like Instagram, Facebook, or Pinterest. Use relevant hashtags to reach more viewers and engage with fellow art enthusiasts.
Frequently Asked Questions
How Can I Learn To Draw Stitch?
You can learn to draw Stitch by following step-by-step tutorials, practicing regularly, and seeking feedback to improve your skills. There are also online courses and books available to help you master the art of drawing Stitch.
What Are Some Tips For Drawing Stitch Accurately?
To draw Stitch accurately, pay attention to his unique features such as his large ears, blue fur, and distinct facial expressions. Use reference images to capture his likeness and focus on getting the details right, such as his spiky fur and mischievous grin.
Are There Any Specific Tools I Need To Draw Stitch?
You can draw Stitch using basic art supplies such as pencils, erasers, and paper. If you prefer digital drawing, a graphics tablet and drawing software can be helpful. However, the key to capturing Stitch’s charm lies in your attention to detail and understanding of his character.
Conclusion
Drawing Stitch may seem intimidating at first, but with the right techniques and practice, it can be a fun and rewarding experience. By following the steps outlined in this blog post, you can create your very own adorable Stitch drawing that captures his unique personality and charm.
Remember, the key to success is to take your time, be patient, and most importantly, have fun! Happy drawing!